Steering System: Difference between revisions
From Seawind1160Wiki
Jump to navigationJump to search
No edit summary |
No edit summary |
||
| Line 3: | Line 3: | ||
'''Documents'''<br> | '''Documents'''<br> | ||
*Factory drawing: [[File:SW1160 Steering System Drawing.pdf|thumb|Link]] <br> | *Factory drawing: [[File:SW1160 Steering System Drawing.pdf|thumb|Link]] <br> | ||
''' | '''Links'''<br> | ||
*Steering system | *Steering system pictures: [https://www.strikhedonia.com/seawind-1160-steering-components/ External Link]<br> | ||
'''Notes'''<br> | '''Notes'''<br> | ||
*Helm Station Play: It is critical that there is no play in when you turn the wheel | *Helm Station Play: It is critical that there is no play in when you turn the wheel, if there is play it can be taken up by tightening the cable ends that attach to each end of the rudder interconnect tube<br> | ||
<br> | <br> | ||
'''General'''<br> | '''General'''<br> | ||
Revision as of 13:52, 12 September 2026
General
Description: Steering system
Documents
- Factory drawing: File:SW1160 Steering System Drawing.pdf
Links
- Steering system pictures: External Link
Notes
- Helm Station Play: It is critical that there is no play in when you turn the wheel, if there is play it can be taken up by tightening the cable ends that attach to each end of the rudder interconnect tube
General
Description: Rudder traveller car improvement
Notes
- SV Nimrod had their rudder traveller car fail while on passage between Queensland, AUS and Tahiti. Dave Straton added a second bearing car to reduce the load and increase reliability.
Guides
- Redesign, two cars: External Link
- Redesign, non-castering wheel
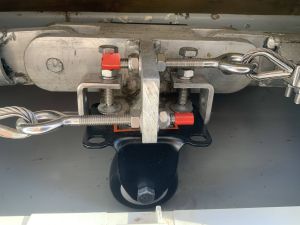
Alternative modification completed by Bill Lippincott on SV Moon Drifter

